New to Cold War Zombies and want to do Outbreak Main Quest 1? Here’s a guide thanks to DETONATED Writers ShoneMonster, and dkdynamite! Here’s Everything you need to know about Outbreak Main Quest 1 and the Legion Boss Fight:
Join forces with Maxis and Ravenov in order to stop an international threat…
Starting Tips
Outbreak is NOT Round Based. It is HIGHLY recommended you become familiar with the mode, especially with the region warping, which is what differentiates this mode from Round Based, apart from the objective focus the mode has. Loadouts recommend for Main Quest 1 include:
Ring of Fire
Frenzied Guard
M16
Dual Wield AMPs
Play Until You Get to Wave 3
You cannot begin this main quest until wave 3, which means you have plenty of time to gear up, complete side objectives and build solid communication with your team before attempting the Easter Egg. Side quests are highlighted in orange on your tac map, while main objectives are highlighted in white with a star. It’s worth saving as much money as possible, in the case you go down during a later wave, to ensure a quick regain.
STEP 1 | Finding The Radio
You need to turn on subtitles and find an unmarked radio which is located in a fixed location on each of the eight regions. Interacting with the radio will spawn a horde of enemies nearby. Once you’ve cleared the zombies, keep note of what number the active static noise is set to. Below are all the locations for the Radio across the eight different regions:
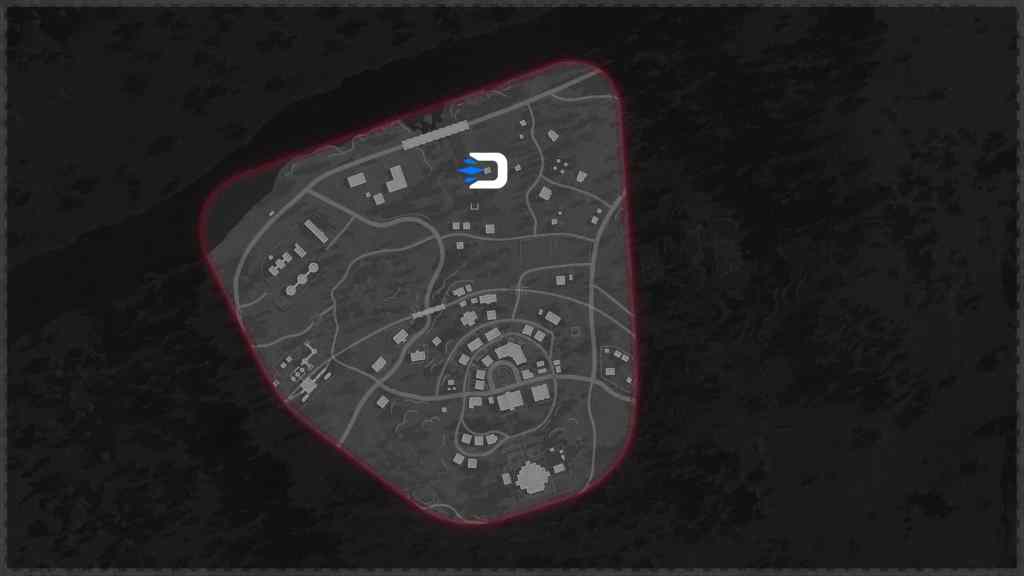
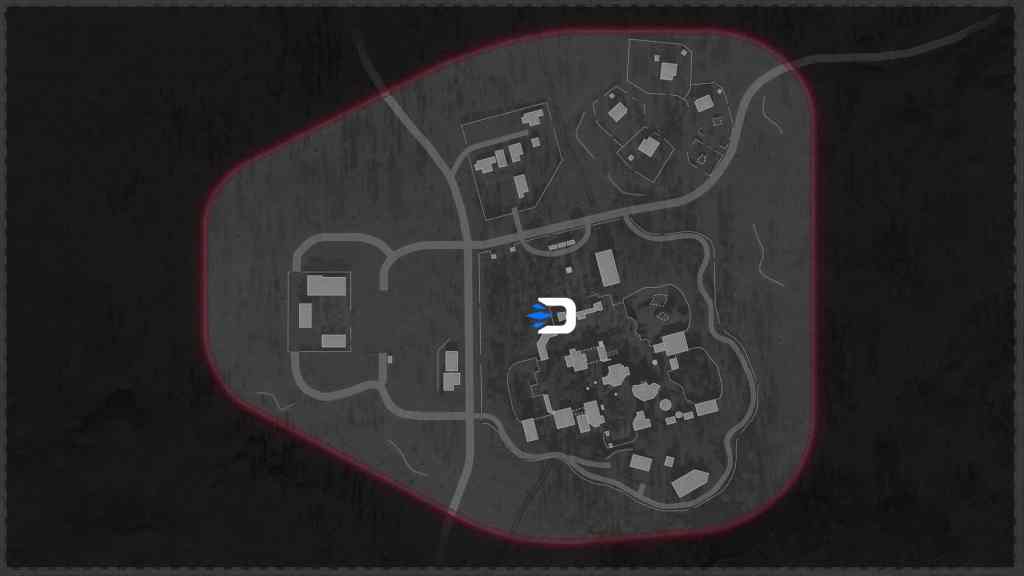
Ruka
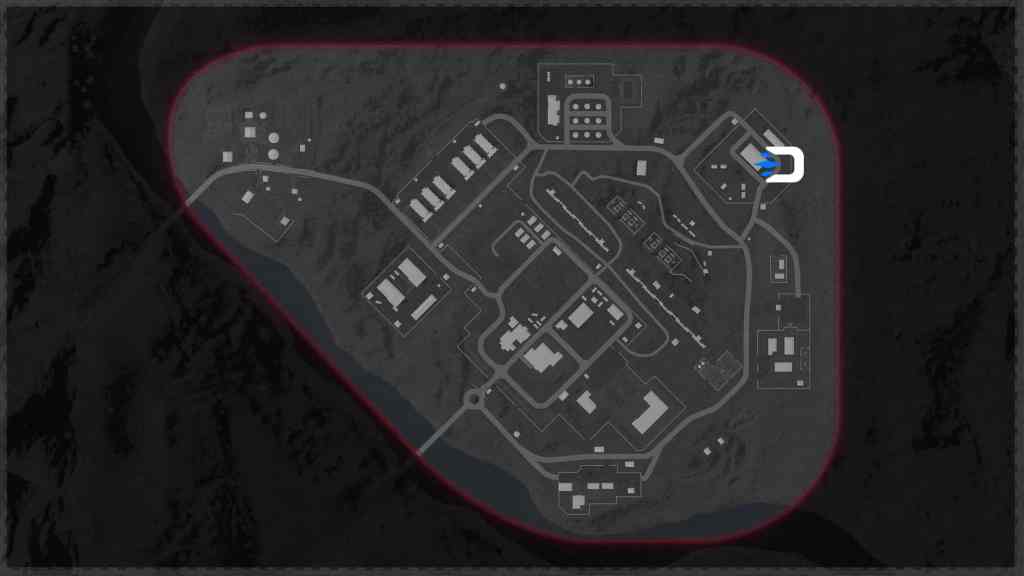
Alpine
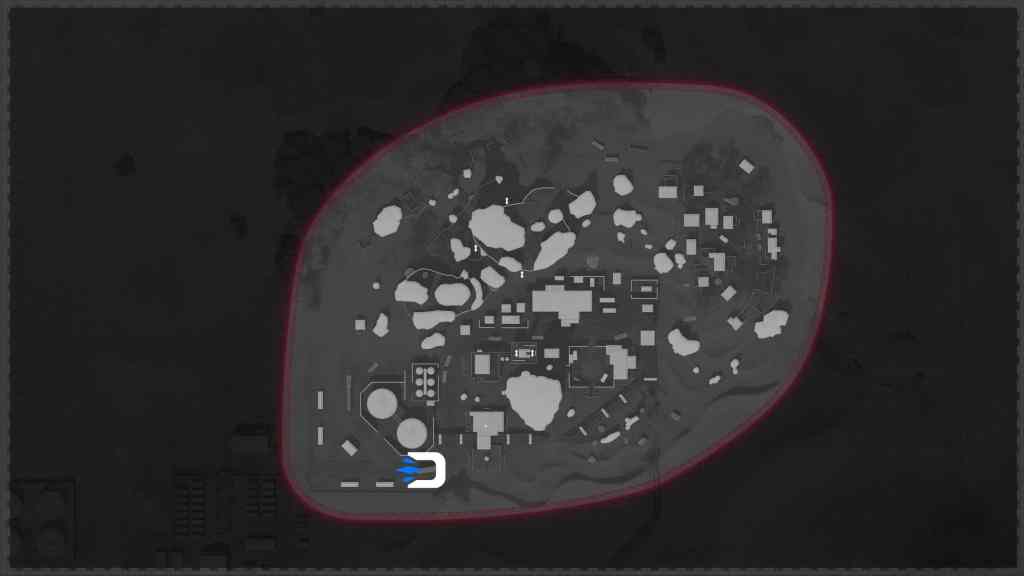
Golova
Sanatorium
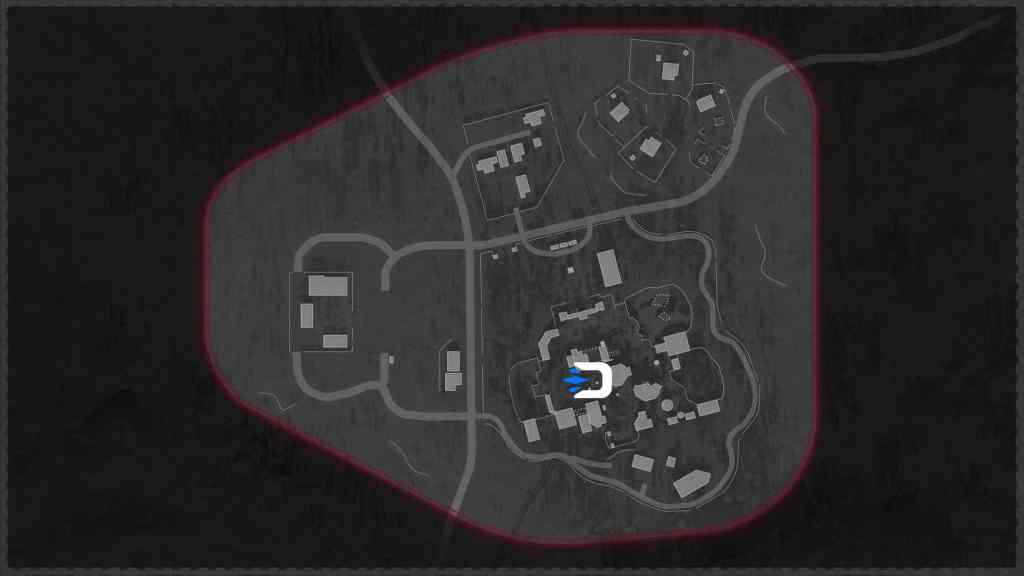
Duga
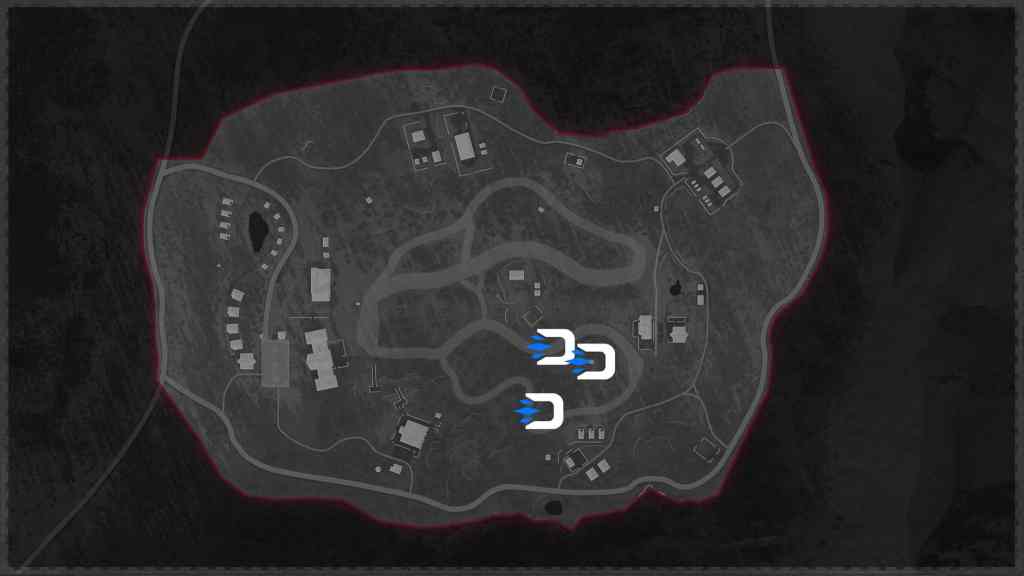
Collateral
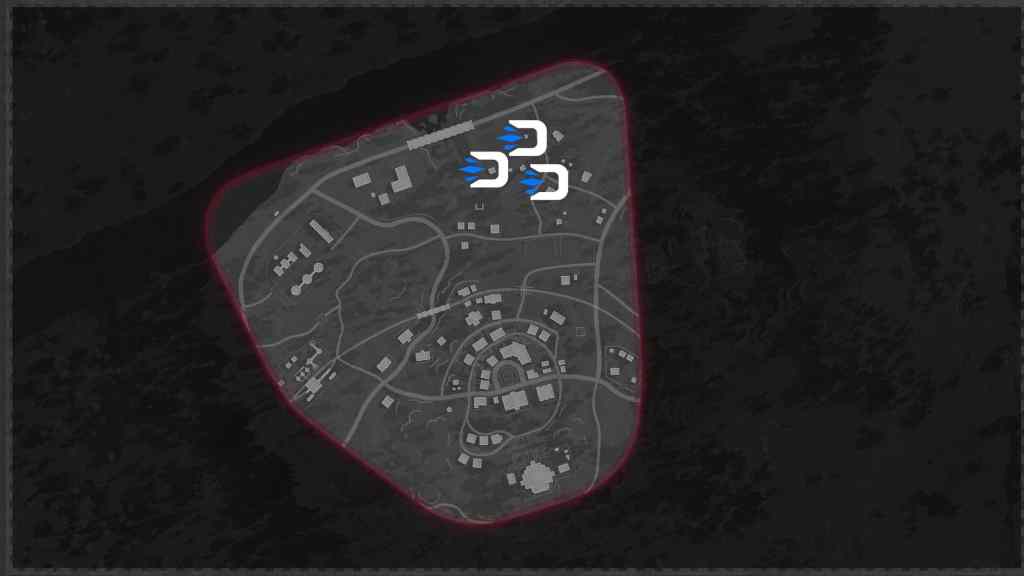
Armada
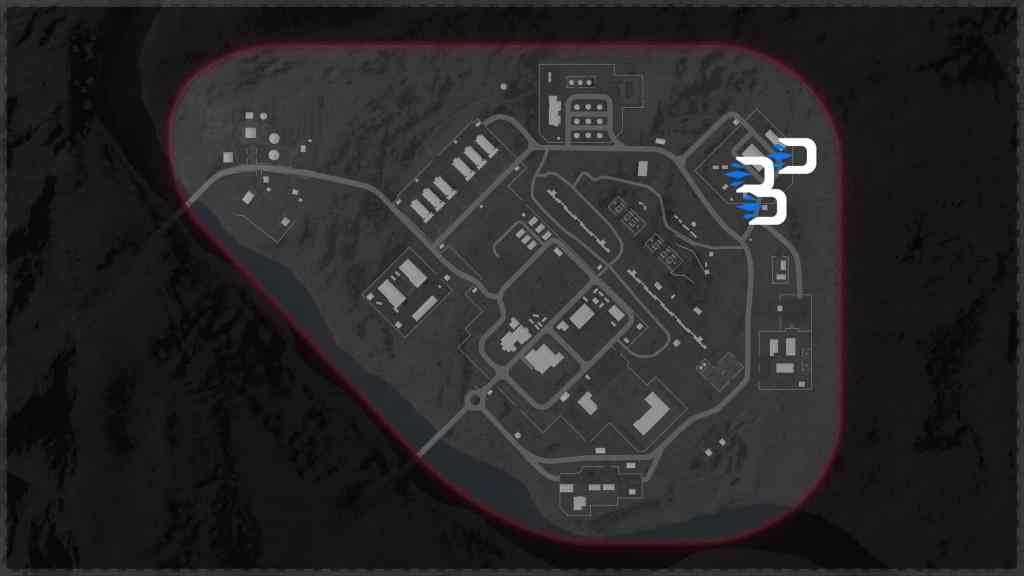
Zoo
STEP 2 | Matching The 3 Radio Frequencies
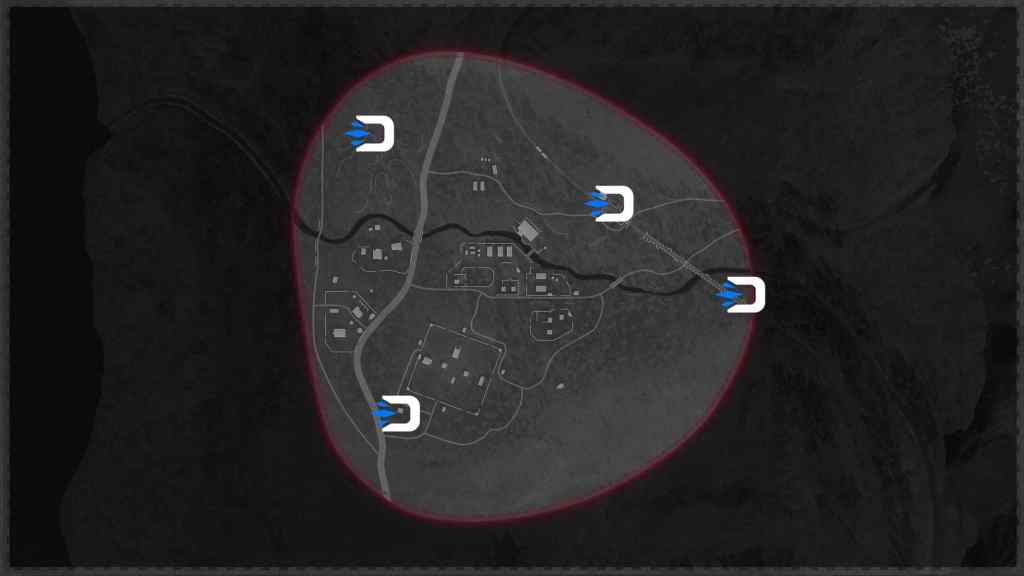
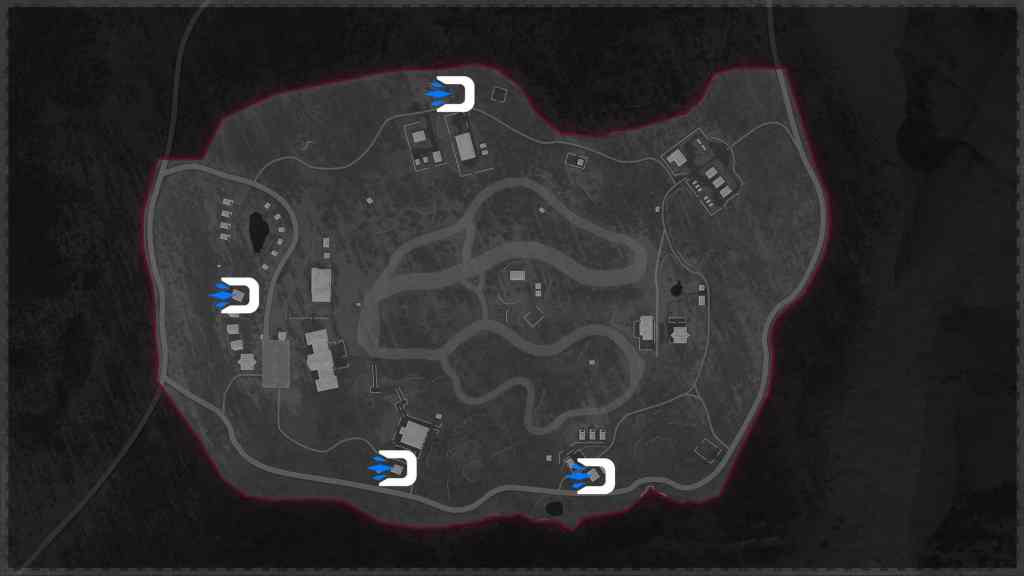
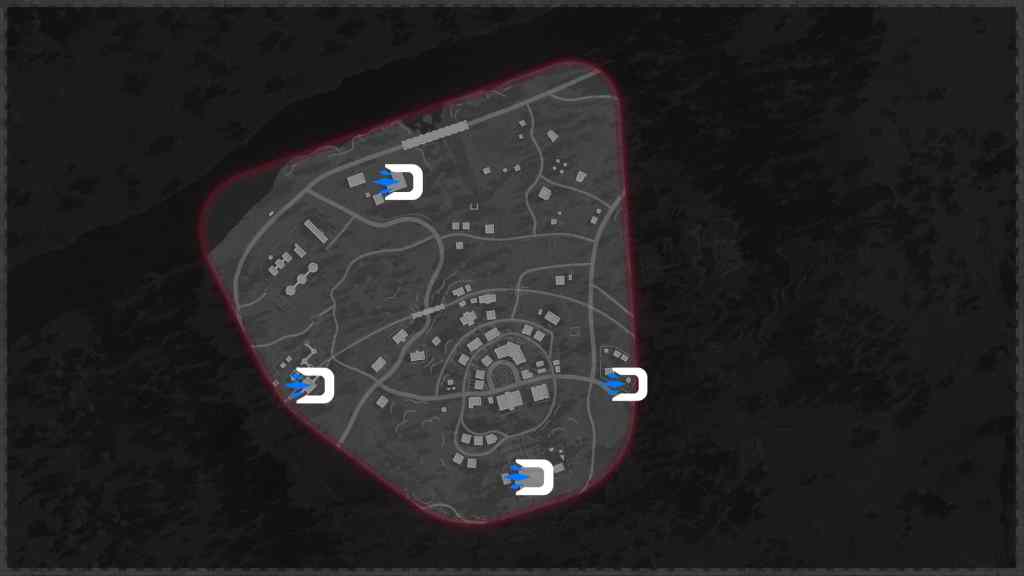
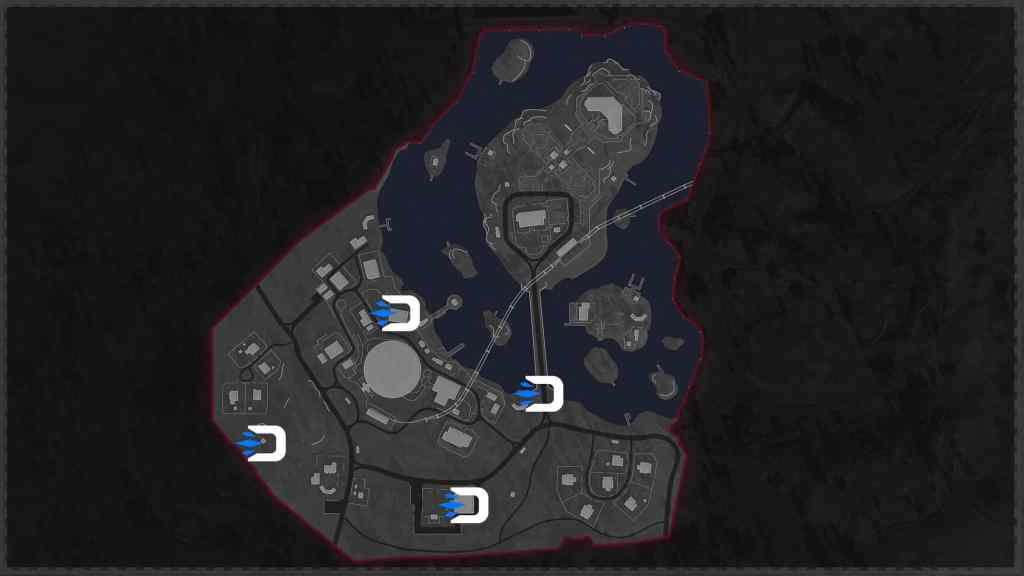
Next, you will need to find three nearby radios and match their frequencies to the number from the original radio. You must keep interacting with the radio until it’s tuned to the right frequency, but you may encounter the feedback alarm which spawns in a horde. Below are all the spawns for the three smaller radios across the eight different regions:
Ruka
Alpine
Golova
Sanatorium
Duga
Collateral
Armada
Zoo
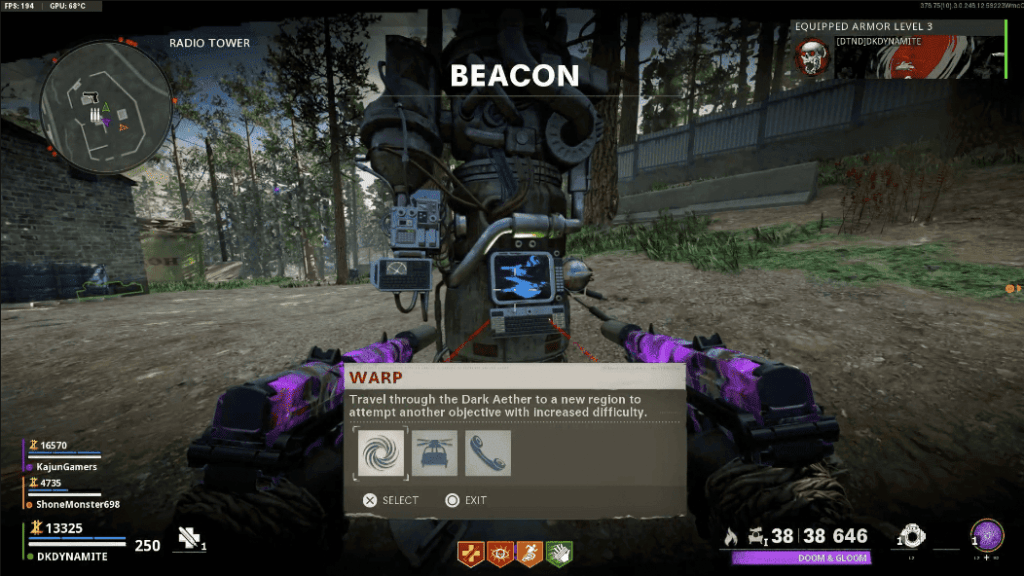
STEP 3 | Calling Maxis
Once you’ve tuned the three smaller radios to the correct frequency, interact with the original radio you found to hear the full message from Maxis, which will then spawn a Beacon Listening Device and some free points. You can proceed with Wave 3 as per usual in order to spawn the beacon used for warping. You’ll now have to respond to a phone call from maxis.
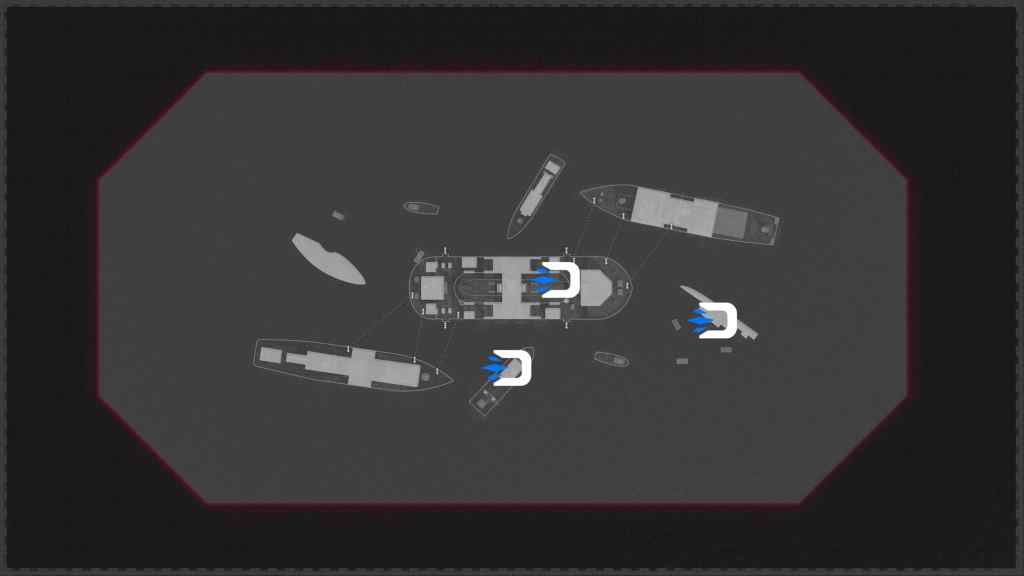
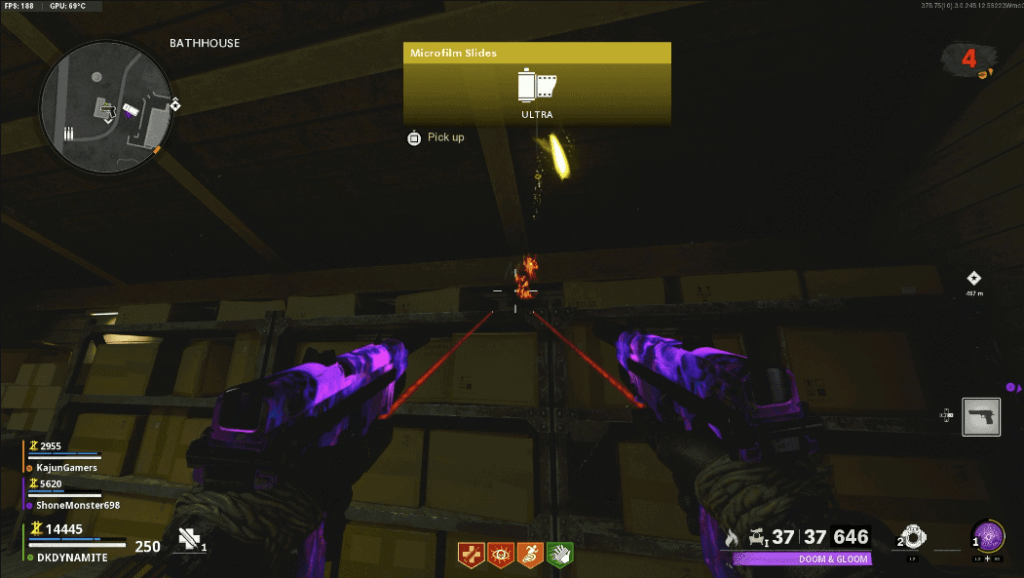
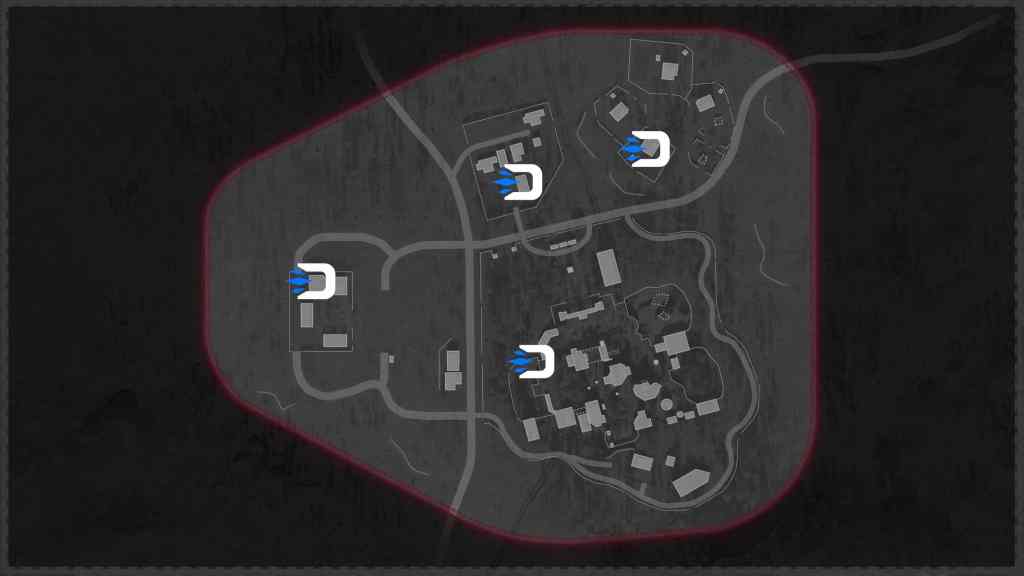
STEP 4 | Locating The Monkey and Film Slides
The next step requires you to find a monkey bomb statue which spawns in four locations on each of the eight regions. Depending on your luck, you’ll have to find and shoot each monkey until one of them drops a film slide. Below are all monkey statue spawns across the eight maps:
Ruka
Alpine
Golova
Sanatorium
Duga
Collateral
Armada
Zoo
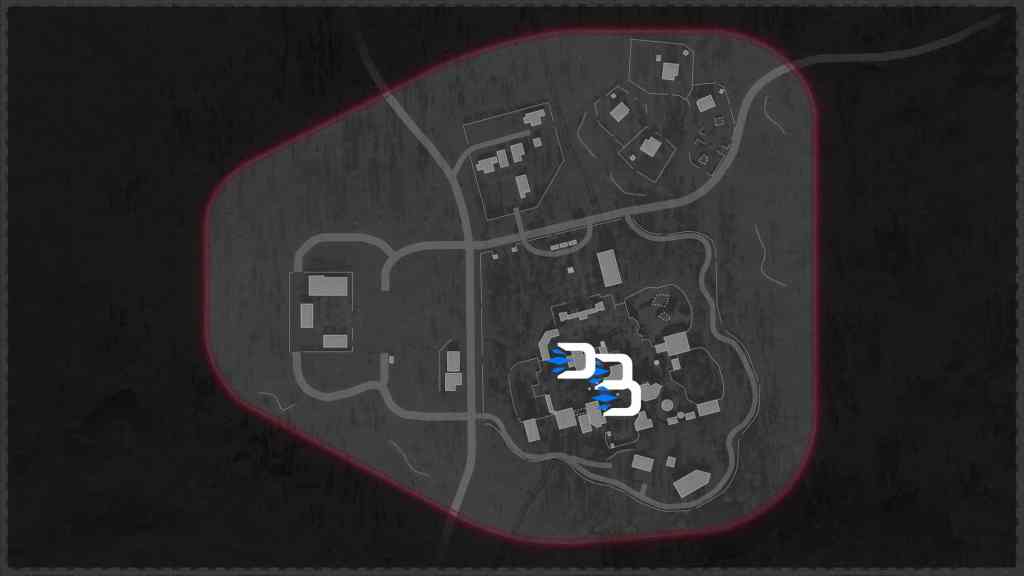
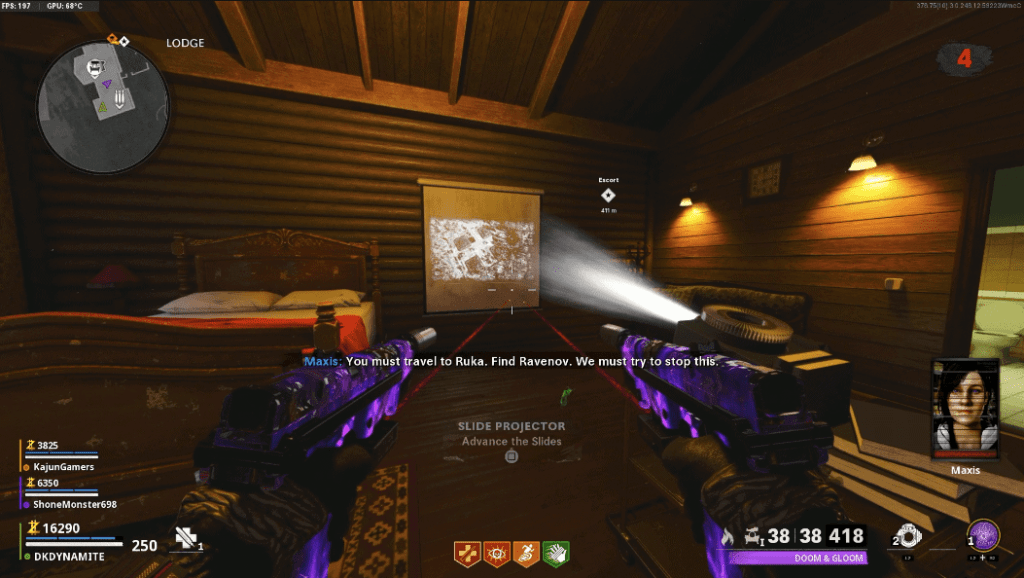
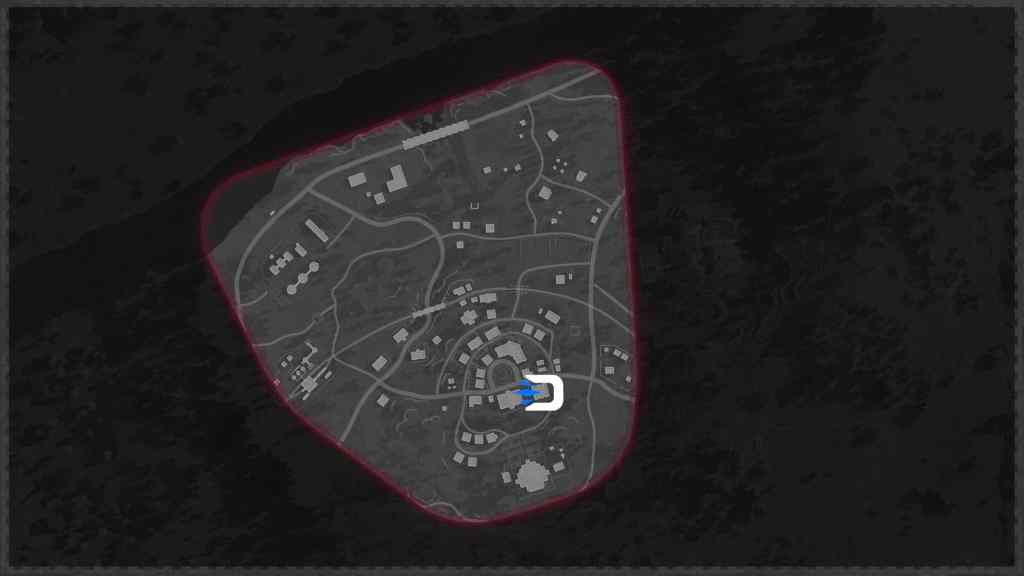
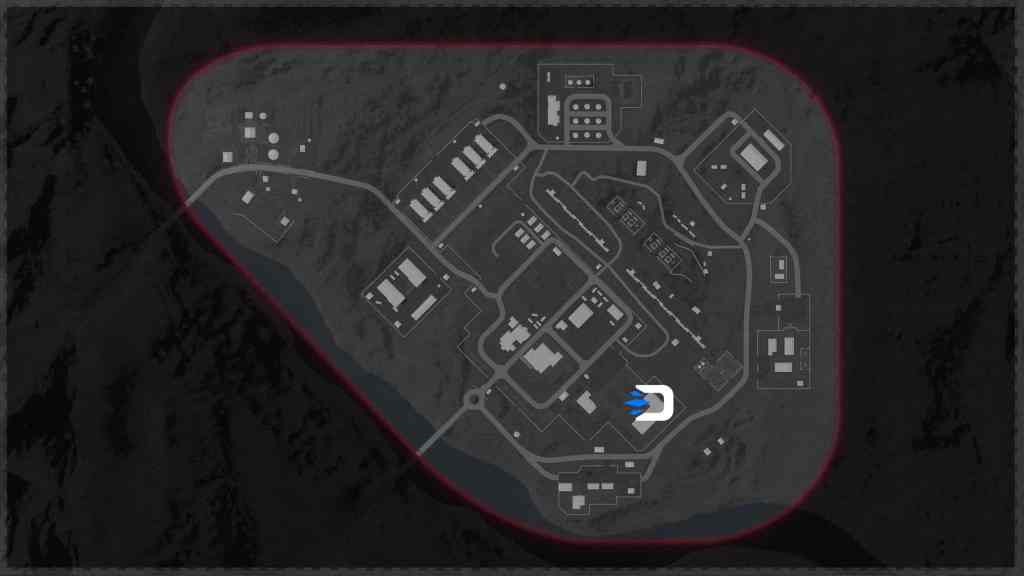
STEP 5 | Finding The Projector
After collecting the film slide, you must now place it into a projector. A projector can be located on all regions apart from Ruka. If you’ve experienced misfortune and happen to be on Ruka, you must warp to the next region to be able and find a projector. Once you find the projector, you need to interact with it three times before you can move on. Below are all projector spawns across the eight maps:
Alpine
Golova
Sanatorium
Duga
Collateral
Armada
Zoo
STEP 6 | Be There or Be Square
Please note that once you decide to warp, you are now locked into the main quest, preventing you from playing Outbreak normally. You will be automatically sent to Ruka, regardless if you’ve previously been there in your match. Once you’ve spawned into Ruka, you’ll notice a new area of interest marked as your main objective.
STEP 7 | Lifting The Lockdown
You’ve now entered the underground bunker, which perfectly fits the vibe of the Cold War. You’ll have to clear the zombies as you work your way through Silo D. Once you’re in Silo D, make your way all the way up the stairs until you reach the very top. Now make your way back to the central area and go into the area marked as the Silo A. Go all the way down to the bottom and you’ll find a terminal that says “Lift the lockdown.” Enjoy the cutscene.
STEP 8 | Finding The Three Launch Keys
You have now been tasked to find three ICBM launch keys, which are in different silos around the bunker you’re in. You can pick up these keys in any order, while your team mates can focus on getting different keys to speed up the pace. Keep in mind you can still access the workbench, wunderfizz and armor station which are split amongst the three silos. Here are the tasks that must be completed to obtain the three keys:
Launch Key 1 – Go to the bottom of Silo A and look for a circular tunnel that has a red glow on it. At the end of the tunnel is an Essence Trap that you can pick up. Now go back out to the main area of Silo A where you’ll need to listen for sound of a monkey. Your tasked with baiting a monkey out of a vent, in order to trap him. The vents have a blue glow to them. These vents can ONLY be found in Silo A. You’ll need to get no closer than 20 meters of the vent and place the Essence Trap. If you get too close, it’ll scare the monkey away and he’ll move to a different vent. After you’ve placed the trap, take a few steps back and the monkey will jump down. Double tap your reload button to the trap the monkey, allowing you to acquire the first key once you pick up the trap
Launch Key 2 – When in the main area in the center that leads to all silos, go down a small hallway that has a dead end. At the end of the hallway, you’ll see a downed soldier that you can interact with. Pick up the key from his body, which will force spawn a red mimic and a group of regular mimics. The launch key will then drop from the dead special mimic.
Launch Key 3 – Go to Silo B and head down to the bottom floor. Look for a canister called the Aetherium Harvesting Unit and interact with it. You’ll then want to run throughout Silo B while picking up purple shards. The shards can be found walls inside of familiar looking aether cyrstals. Shoot the crystals so that the purple shards drop. You’ll need 20 shards in total but once you’ve collected them all, you can deposit them in the canister. A short sequence will begin, where zombies and special enemy types will spawn in. Once the canister is ready to be picked up, you can take it to Silo D, where you’ll see a giant jellyfish. Go up the stairs and stand in the Aetherium grass before you use the canister’s ability. You can activate it’s ability by treating it like a field upgrade. Once done correctly, you’ll levitate and be sent into the jellyfish where you can grab the last key. You can now prepare for the final step before boss fight.
STEP 9 | Activating The Launch Sequence
This next step requires a little bit of trial and error, but can be done even easier with one player being in each silo. You’ll need to interact with the large terminal at the top of Silos A, B and D in the correct order. If you happen to get the order wrong, you’ll have to wait a good minute or two before trying again. If you happen to activate the correct terminal, you’ll be given 45 seconds to reach the next silo to repeat the same steps. Once you’ve activated the three terminals in the correct order, you’ll be able to head to the boss fight. As each player interacts with this door, a nine minute timer will begin, which is how long you have to defeat the boss: Legion.
STEP 10 | The Legion Boss Fight
If the boss wasn’t enough for you, then you’ll be happy to meet the endless amount of zombies and special enemy types which will be hunting you and your team. Defeating Legion is relatively straight forward, but still easier said than done. While dealing with the horde, your goal is to shoot Legion in his chest to weaken his armor, which will eventually destroy his shield bubble. Once his shield bubble is down, you’ll be able to shoot the three orbs above him, which will actually weaken him. The orbs only appear for a limited amount of time before the shield bubble reappears, so it’s best to focus all your firepower on one orb at a time.
A common strategy is to have one player on the squad use frenzied guard to attract all nearby zombies while still attempting to shoot an orb, while the rest of the squad goes untouched, focusing on the same orb and even utilizing ring of fire. Each orb above legion can be considered a phase, as once the first orb is destroyed, he’ll begin his lightning attacks, which will deem certain parts of the environment unplayable. As you destroy the second orb, even more elite zombies will begin to spawn, making it harder to focus on Legion. After all three orbs are destroyed, all zombies will be despawned, and a cutscene will begin to play.
You’ve Completed The First Outbreak Easter Egg!
Click the map names below to access our other guides on the Cold War Zombies maps!