New to Cold War Zombies in 2023 and want to do the Forsaken Main Easter Egg? Here’s a guide thanks to DETONATED Writer fajarty! Here’s Everything you need to know about Forsaken:
End everything once and for all, Save Zykov. He has the key to defeating the Forsaken…
Turning on Power and Pack-A-Punch
To Turn on the Power and Unlock Pack-A-Punch, we must first make our way into the Facility and then Get to the Observation Tower.
Enter Facility
After spawning into the game, there will be an objective marker on your screen. Follow it until you see the teleporter on the North Side of the Staging Area.
- Upon activating the Teleporter, you will have to Survive for 30 seconds until it allows you to travel into the Facility
NOTE: The spawn area has rounds overlap with each other, it WILL get very chaotic past round 5. Save up some money, then teleport so you can buy a lot of the doors to make your way through the map.

After Teleporting into the Facility, you will then spawn in the Checkpoint area of the map where the Juggernog perk is.
Get to Observation Tower
Make your way through the Checkpoint area and buy the door with the marker over it. Doing this will then open the Main Street Area. You can choose to buy the doors on the left or the right side.
NOTE: Left side has Stamin-Up Perk, Right Side has Quick Revive Perk. Depending on what perk you want to buy early game, that should be the route you take through Main Street.


- Upon taking the Teleporter from Main Street, you will then be teleported to the Video Store Rooftop
You must now collect 4 parts in this new area, they are as follows:
1/4 – Circuit Board in the Video Store
There are 3 locations for the Circuit Board in the Video Store:
- Underneath the Stairs on a box
- Sitting on a shelf
- On a white box with 2 black boxes on top of it


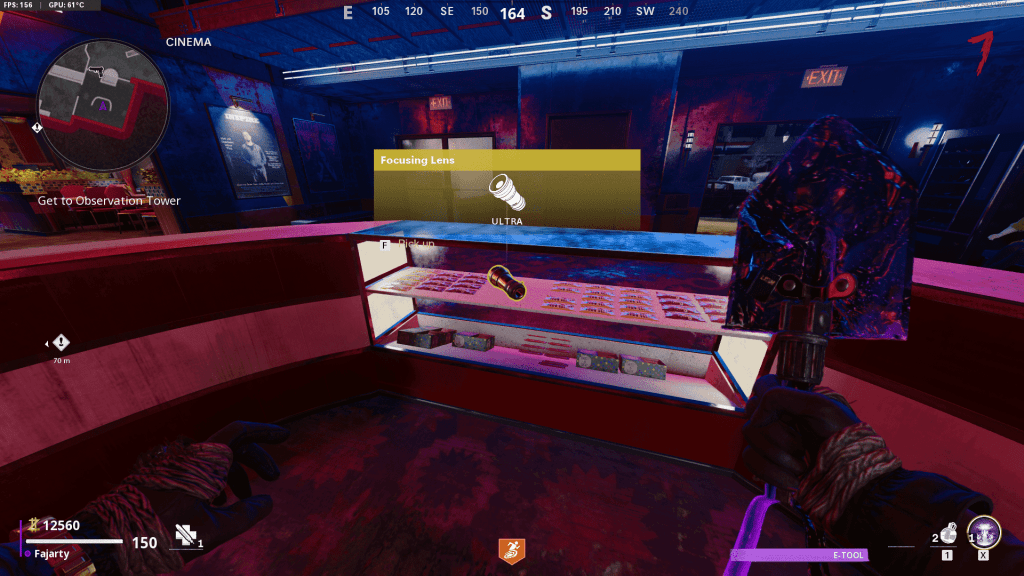
2/4 – Focusing Lens in the Cinema
There are 3 locations for the Focusing Lens in the Cinema:
- In a mannequins hand that’s sitting down
- In the corner on a bench
- Behind the counter


3/4 – Cathode-Ray Tube in the TV Store
There are 3 locations for the Cathode-Ray Tube in the TV Store:
- On the backwall by the TV with static
- On the shelves by the windows
- In the corner on a table with a potted plant


4/4 – Fryer Cage in Burger Town
There are 3 locations for the Fryer Cage in Burger Town:
- Behind the counter inside the glass display case
- On top of cooking equipment near soda machine
- In the corner by the American Flag


Repair the Teleporter
After collecting all 4 parts to repair the teleporter, make your way to the Fuel Processing area and nteract with it the broken teleporter to rebuild it.
Once teleported, you will spawn in the Bunker Entrance Area. Make your way to The Amplifier room by following the objective marker.

Kill the Abomination
After opening up doors to The Amplifier room, an Abomination will come out of the teleporter once you get close enough to it. Kill it then proceed into the Observation Tower.
This will then teleport you into the Observation Tower.
Lift Lockdown
After teleporting into Observation Tower, run to the Terminal and press the button in order to Lift the Lockdown.
NOTE: You only have a limited amount of time inside of the Observation Tower. Make sure you do what you have to FAST or else you will slowly die overtime. This is indicated by the radiation noise that gets more intense the longer you stay in the Observation Tower.
Congratulations! You’ve Just Turned on Power and Opened Pack-A-Punch!
STEP 1 | PRESS RED BUTTON
On the South Side of the Observation Tower, there is a red button you must press in order to start the Easter Egg.
NOTE: You can press this whenever, you don’t need to be setup for this.

Upon Pressing the button, a cutscene will play. You can choose to skip or watch it. After it is over, you can now start doing Main Easter Egg steps.
But First, it would be beneficial to get the Chrysalax Wonder Weapon as it necessary during some of these steps:
OBTAIN THE CHRYSALAX WONDER WEAPON
There are multiple ways to obtain the Chrysalax, you can either:
- Redeem Legendary Trial Rewards
- Spin the Mystery Box
- Complete its own buildable quest
In my personal opinion the best way is to Redeem Legendary Trial Rewards, so we will focus on that.

The Trial Machine is found in the center of the Observation Tower, its a great way to farm points while earning your way to a Chrysalax Wonder Weapon. You must initiate a trail and do as it says in order to earn a Legendary Reward, these rewards have a chance of giving you the Chrysalax.
If you dont get it the first time, its fine. Use the points gained from it to get setup and buy perks/Pack-A-Punch for the boss fight and try again.
Now that you are equipped with the Chrysalax, the rest of the steps will be a breeze!
STEP 2 | BUILD THE NEUTRALIZER
You can now work towards building the Neutralizer. It requires 3 parts and 3 crystals in order to move on to build it. They can be collected in any order but this method leaves the least amount of room for error, let start with the 3 parts:
1/3 – Collect the Fuel Tank
Make your way to the Fuel Processing area, there you will find a set of controls to interact with. Once started, you will start a lockdown in the Fuel Processing area and wont be able leave.
After killing all of the Tempests and Disciples, the Fuel Tank will drop in the middle of the Fuel Processing area. Pick it up and move on to the next Neutralizer part!

2/3 – Collect the Housing Unit
Make your way to the Board Room inside of the Bunker near The Amplifier room.
NOTE: It is recommend to enter through the East side of the room in order to get the Abomination spawn perfectly lined up with the wall it has to hit.
Once the Abomination spawns, let him charge you can hit the wall shown in the video. Pick up the Housing Unit piece and on to the next!
3/3 – Collect the Monitoring Device
First you must add the Dead Wire Ammo Mod onto your weapon. You can do this buy purchasing it at the Pack-A-Punch Machine for $2000.
Once you have done that, make your way to the Arcade area and shoot a zombie near the shown arcade machine in order to electrocute it.
After turning on the Arcade Machine, you will now have the option to control an ARC-XD for another $2000. You must purchase this and drive the ARC-XD into a secret vent inside of the TV Store then explode it, as shown below.
NOTE: The ARC-XD is extremely delicate and might explode a few times before you can make it into the TV Store.
Congratulations! You have collected the 3 parts for the Neutralizer! Now onto the 3 Catalyzed Crystal Shards!
Gather 3 Catalyzed Crystal Shards
Now we need 3 Catalyzed Crystal Shards from 3 different large purple crystals from around the map. All steps are the same for each location:
- With the gun version of the Chrysalax, shoot the 3 moving purple orbs floating around them
- Swap back to the Melee version of the Chrysalax, hit the large purple crystal
- Pick up the ‘Crystal Shard’ Throwable Item
- An Abomination will automatically spawn, throw the shard into one of their open mouths
- Wait for their tail to glow red, kill them
- Pick up Catalyzed Crystal Shard
1/3 – The Amplifier Catalyzed Crystal Shard
Here’s a video example of what is should look like when putting all these steps into action.
2/3 – Storage Zone 5 Rooftops Catalyzed Crystal Shard
Repeat above steps and follow video!

3/3 – Staging Area Catalyzed Crystal Shard
Repeat above steps and follow video!

Congratulations! You have now collected all parts in order to build the Neutralizer!
BUILD THE NEUTRALIZER
With all 6 parts, head over to the Main Street area and craft the Neutralizer!
At this time, the Neutralizer needs some time to warm up. Wait until the character quotes stop and the Neutralizer should allow you to activate it!
NOTE: There is no turning back after this point.
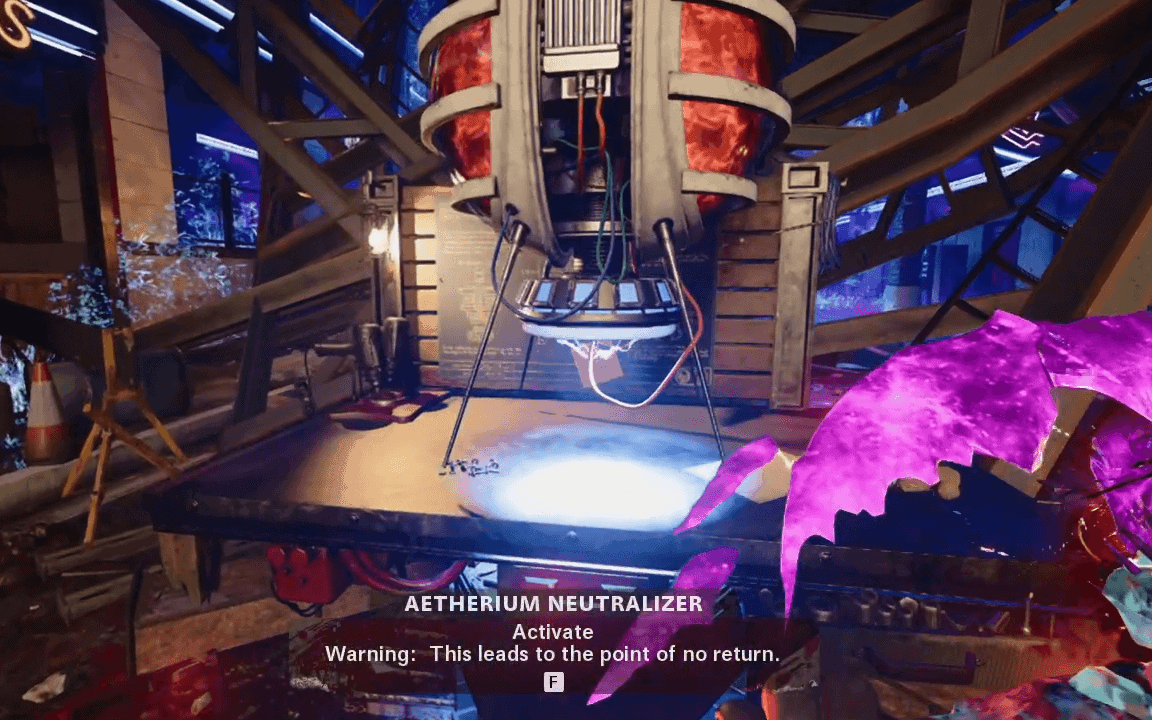
STEP 3 | ESCORT THE NEUTRALIZER
Once Activating the Neutralizer, you must stay inside of its bubble so it keeps moving.
Overtime this bubble will slowly shrink, and you must retrieve Catalyzed Crystal Shards to expand it again. These are found from the red crystals you will see when escorting the Neutralizer. Pick them up and bring them back to the Neutralizer to restore the bubble size.

Once you complete the escort, it will spawn a Pack-A-Punch, Ammo Crate, Wunderfizz, and an Armor Station so you can gear up before the final boss fight.


Are you ready to take on the Forsaken? Lets do it.
STEP 4 | FORSAKEN BOSS FIGHT
PHASE 1 – Shoulders
As soon as you open the containment door, you are presented with Maxis and the Forsaken inside our Boss Fight Arena. Focus fire on his Shoulders as soon as possible.
- You should be immediately trying to shoot both of his shoulders until you destroy them. This will be indicated by the blue bar above his health bar.
- Additionally, you should be killing zombies in the ring below Maxis, so she can charge the laser cannons. Mini-Bosses charge her the fastest.
Once you have a shoulder destroyed, you will be able to hit it with the laser cannon Maxis charged up for you.
After shooting both shoulders and completing Phase 1 of the Boss Fight, the Forsaken should teleport you into a vision of what will happen to our characters in the future. Maxis intervenes and pulls us back and we start Phase 2.
Phase 2 – Stomach
This phase we will be much like the last, except we will be focusing fire on the Stomach now. The Forsaken will also have new attacks like a laser beam he will shoot at you and more.
- You should be immediately trying to shoot the stomach until you destroy it. This will be indicated by the blue bar above his health bar.
- Additionally, you should be killing zombies in the ring below Maxis, so she can charge the laser cannons. Mini-Bosses charge her the fastest.
Phase 3 – Head
This phase we will be much like the last, except we will be focusing fire on the Head now. The Forsaken will also have new attacks, like freezing ice rings and moving electric fields.
- You should be immediately trying to shoot the head until you destroy it. This will be indicated by the blue bar above his health bar.
- Additionally, you should be killing zombies in the ring below Maxis, so she can charge the laser cannons. Mini-Bosses charge her the fastest.
After defeating the Forsaken, a bunch of large dark aether crystals should fall from the sky. Additionally, the characters should be panicking and the player should be losing health. Don’t worry! This is normal.
The ending cutscene should play after this, and with that, Congratulations!
You’ve Completed the Forsaken Easter Egg!

I’m sure we’ll meet again 🙂
Click the map names below to access our other guides on the Cold War Zombies maps!
- Die Machine Easter Egg
- Firebase Z Easter Egg
- Outbreak Easter Egg 1
- Outbreak Easter Egg 2
- Mauer Der Toten Easter Egg
- Super Easter Egg
Stay connected with any new updates as they release on our Twitter, and our YouTube Channel!