
Season 4 Reloaded offers yet another Easter Egg camo unlock in the Raid finale
THE FINAL RAID EASTER EGG CAMO
Season 4 Reloaded of Modern Warfare 2 offers one last quest inside of the Raid finale which unlocks the Tarnished camo. This unlock is significantly easier to obtain as opposed to the secret blueprint in Episode 2 or the Murk camo from Episode 3. It’s highly recommended you become familiar with Raid Episode 4 before attempting to unlock the Tarnished camo, which you can catch up on with our visual guide or my video tutorial here
FIND TWO FRIENDS
If you need to find two friends to do this Raid with either use the new LFG party system added into Season 4 Reloaded, or join DETONATED/dkdynamite’s Discord Server “The Bomb Shelter” and ask around for some help! People hop into parties all the time there and it might be useful for anyone needing some assistance!

THINGS TO KNOW BEFORE YOU START
This Raid throws a lot of you. Before you start, set up a loadout with:
- FTAC Siege Pistol
- KV Broadside Shotgun with Dragon’s Breath
OBTAINING THE SECRET CODE
Whoever starts as Farah and gets past the laser needs to go DOWN the stairs where the solider comes out. Don’t worry though, as the patrolling soldier won’t spawn in until you ascend UP the stairs as per usual. You will then hear a voice line from the solider behind the door saying something saying the secret code, which is often a combination such as 532, 534, etc. Take note of the combination, and keep in mind you ARE able to die after this point, as it will not effect your progress.
PULLING THE CORRECT LEVERS
Upon proceeding with the rest of the Raid, you wanna keep note of the numbered rooms in the big hangar you enter after freeing the Price and Alex. Once you’ve cleared the room of enemies, you need to go along the left and right sides of the hangar and look at the rooms with the big windows. Near each window will be a number. On the left side you’ll see rooms 1 and 3, while on the right you’ll see rooms 2, 4, & 5. In each room will be a lever you can pull
You now want to use the secret code you got earlier to determine which switches you’ll be pulling. The code typically begins with a 5, and in this particular match it was 532. Pull those levers in the correct order, and you should get an audio cue that something was unlocked
COLLECTING THE UNLABLED KEYCARD
After getting past the first laser puzzle and disabling the traps, you’ll notice an extra room to the left of has been opened but is still guarded by lasers. You need to mantle on the nearby crate and then the framework, to then jump over the traps. Once inside the extra room, you will have more lasers to get around and at the back of the room is where you can disable the traps and find an unlabeled keycard.
TURNING THE VALVES IN THE MAZE
Once you progress to the maze, there will be four valves marked 1-4 that you can turn while inside, which need to be set to the secret code you obtained earlier. The valve that gets turned in the map room, which disables the leaky gas valves, is considered number 5. All players need to hit the correct valves in sync with one another. Since our code was 532, each player turned the valve at the count of three.
Please be aware that FULLY dying out in the maze will remove the keycard from your inventory upon respawning. You must fully restart the episode if you get wiped in the maze. Below, you can find a visual guide of where the numbered valves are in the maze. They’re all found in the dead ends of each pathway.
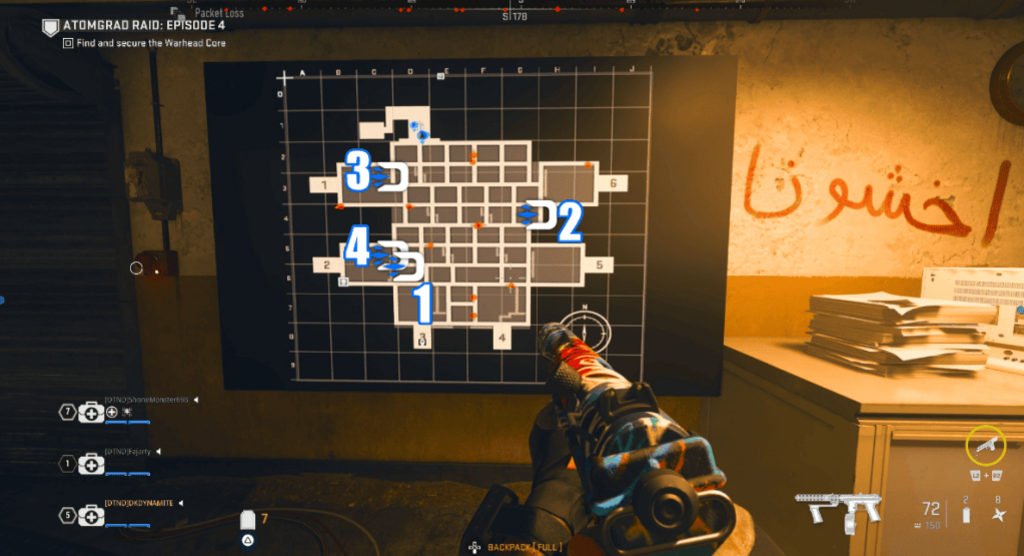
Strangely, you don’t get an audio cue that the valves were turned in the correct order, but beware of the juggernauts which will be patrolling the area.
USING THE KEYCARD TO UNLOCK THE BUNKER
After all valves have been turned, you must now navigate to the area labeled as number 5 on the map. In this area will be a gate that’s now open, and inside is a panel you can swipe your keycard on to open the nearby bunker door. Once inside the bunker, you can pick up the secret M4 which has the Tarnished camo. The Easter Egg camo will then permanently unlock for everyone in the match once one person picks up the M4. At this stage, it’s recommended you finish the Raid just in case, as the Projectile veteran camo is still appearing as locked for many who’ve finished the episode.
“TARNISHED” EASTER EGG CAMO
If you completed the Easter Egg, you should now be able to use the “Tarnished” Camo! Just go to any gun, select camos, go down to “Event” camos, and it should be unlocked!
THE END
If this guide was helpful in completing the Raid Episode 4 Easter Egg, make sure to share it! Below will be a video that further explains how to unlock the Tarnished camo:

Stay connected with any new updates as they release on our Twitter, and our YouTube Channel!